List and Identifiable in SwiftUI
Published on 16 Oct 2023
In this tutorial, we will learn how to create a List in SwiftUI that dynamically grows. We will also learn about Identifiable and how to add a Navigation with a Button.
1. Create a new SwiftUI Project
In Xcode go ahead and create a new project and select Single View App. If you want to see how to create a new SwiftUI project have a look at the previous article:
Understanding @State in SwiftUI2. Create a static List
Once your project is created navigate into the ContentView.swift file replace the code with the following:
struct ContentView : View {
    var body: some View {
        List {
            Text("Charmander")
            Text("Squirtle")
            Text("Bulbasaur")
            Text("Pikachu")
        }
    }
}
What if I told you this is it? That there’s nothing else to add? Well.. It really is!
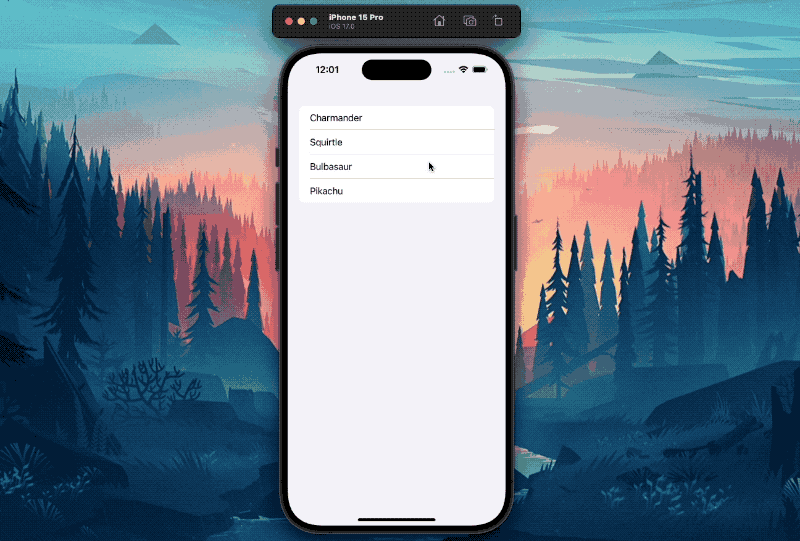
The List will create a row for each View that is inside of it - and render that view in that row. We have 4 Text views. A row for each then 😊
How about we make our List a little more interesting before we move on and add the type to each Pokémon? Let’s do it:
struct ContentView: View {
    var body: some View {
        List {
            HStack {
                Text("Charmander")
                Text("Fire").foregroundStyle(.red)
            }
            HStack {
                Text("Squirtle")
                Text("Water").foregroundStyle(.blue)
            }
            HStack {
                Text("Bulbasaur")
                Text("Grass").foregroundStyle(.green)
            }
            HStack {
                Text("Pikachu")
                Text("Electric").foregroundStyle(.yellow)
            }
        }
    }
}
We’re using an HStack to have the Pokémon name and type stacked horizontally next to each other. With .foregroundStyle we give the second Text view a cool matching color.

3. Make the List dynamic.
A static List can make sense especially if you want to implement a Setting view. Static here meaning you define the List once and it stays like that. Our goal now is to adjust our List so that it is based of an Array of elements. There are a few ways of achieving that. Let’s have a look at two ways starting with the simpler one. Create a Pokemon struct with name, type, and color:
import SwiftUI

struct Pokemon {
    let name: String
    let type: String
    let color: Color
}

struct ContentView: View {
    var body: some View {
        List {
            HStack {
                Text("Charmander")
                Text("Fire").foregroundStyle(.red)
            }
            HStack {
                Text("Squirtle")
                Text("Water").foregroundStyle(.blue)
            }
            HStack {
                Text("Bulbasaur")
                Text("Grass").foregroundStyle(.green)
            }
            HStack {
                Text("Pikachu")
                Text("Electric").foregroundStyle(.yellow)
            }
        }
    }
}
Now we can go and create a variable inside of our ContentView struct, name it pokemonList and assign an array of Pokemon instances to it:
struct ContentView: View {
    var pokemonList = [
        Pokemon(name: "Charmander", type: "Fire", color: .red),
        Pokemon(name: "Squirtle", type: "Water", color: .blue),
        Pokemon(name: "Bulbasaur", type: "Grass", color: .green),
        Pokemon(name: "Pikachu", type: "Electric", color: .yellow),
    ]

    var body: some View {
        List(pokemonList, id: \.name) { pokemon in
            HStack {
                Text(pokemon.name)
                Text(pokemon.type).foregroundStyle(pokemon.color)
            }
        }
    }
}
You can see that I also updated our List view to accept our new array. Whenever we use a List based on an Array we also have to let the List know how to identify each row as unique. In our case, the name of each pokemon works quite well.
If you run the project now everything should work just like before!
4. Understand Identifieable
Let’s break our List a little to really understand the need of id with simply changing the name of Squirtle to Charmander and run the project.
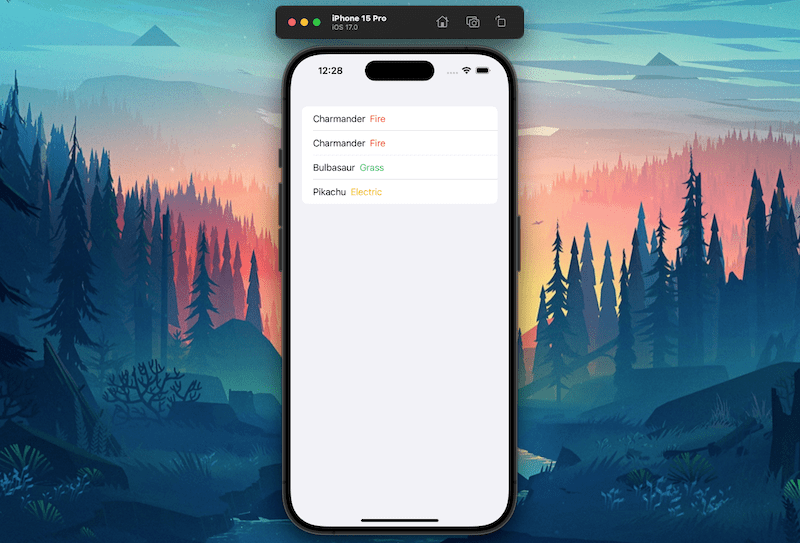
You can see that our List updates accordingly, however, something is off.. If you look closely the second row indeed says Charmander just like our second element in our Array. BUT we kept the type of that second element to Water yet the List shows Fire.
This is because the List is confused since it has two rows with the same Identifier. Two rows identify themselves with the String Charmander. That’s a no no. Let’s rename our Pokemon back to Squirtle.
Here’s another way of letting our List know how to identify each row as unique and I think in the future we will prefer this one over the simpler one:
import SwiftUI

struct Pokemon: Identifiable {
    let id: Int
    let name: String
    let type: String
    let color: Color
}

struct ContentView: View {
    var pokemonList = [
        Pokemon(id: 0, name: "Charmander", type: "Fire", color: .red),
        Pokemon(id: 1, name: "Squirtle", type: "Water", color: .blue),
        Pokemon(id: 2, name: "Bulbasaur", type: "Grass", color: .green),
        Pokemon(id: 3, name: "Pikachu", type: "Electric", color: .yellow),
    ]

    var body: some View {
        List(pokemonList, id: \.id) { pokemon in
            HStack {
                Text(pokemon.name)
                Text(pokemon.type).foregroundStyle(pokemon.color)
            }
        }
    }
}
When conforming to the Identifiable protocol we have to to implement a variable called id. However this variable does not have to be an Int. The protocol only requires that the type of the variable id is actually Hashable.
When confirming to the Identifiable protocol we no longer have to explicitly tell the List how the elements in our Array are uniquely identified. 🥳
5. Dynamically add elements to the List
What we are about to do is really cool! We will add a NavigationBar to our List with a Button that randomly adds a new Pokemon to our List. Cool? Very cool. 😎
Adding a Navigation is as simple as:
struct ContentView: View {
var pokemonList = [
Pokemon(id: 0, name: "Charmander", type: "Fire", color: .red),
Pokemon(id: 1, name: "Charmander", type: "Water", color: .blue),
Pokemon(id: 2, name: "Bulbasaur", type: "Grass", color: .green),
Pokemon(id: 3, name: "Pikachu", type: "Electric", color: .yellow),
]
var body: some View {
NavigationStack {
List(pokemonList) { pokemon in
HStack {
Text(pokemon.name)
Text(pokemon.type).foregroundStyle(pokemon.color)
}
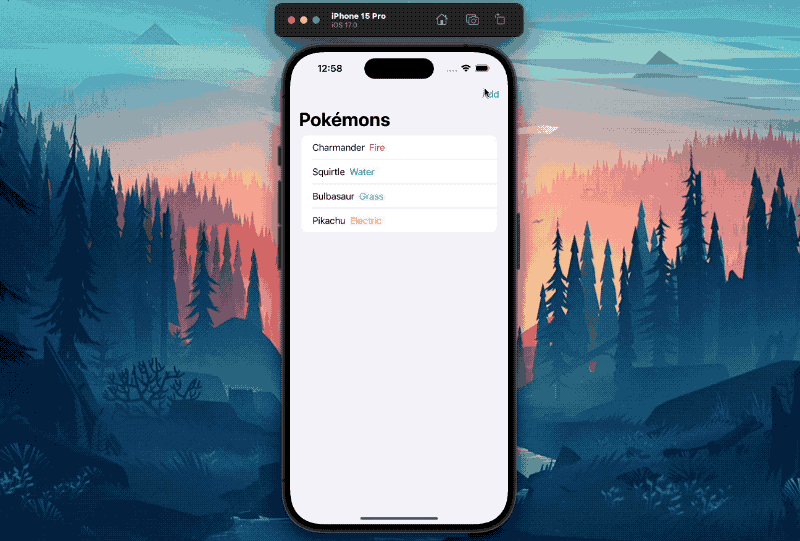
}.navigationBarTitle(Text("Pokémons"))
}
}
}You should end up with a view that looks like this:

Let’s implement a function that will randomly add a pokemon to our pokemonList variable. And let’s also make our variable a @State variable so that as soon as we change its value by adding a new element, our view updates automagically.
struct ContentView: View {
    @State
    var pokemonList = [
        Pokemon(id: 0, name: "Charmander", type: "Fire", color: .red),
        Pokemon(id: 1, name: "Squirtle", type: "Water", color: .blue),
        Pokemon(id: 2, name: "Bulbasaur", type: "Grass", color: .green),
        Pokemon(id: 3, name: "Pikachu", type: "Electric", color: .yellow),
    ]

    var body: some View {
        NavigationStack {
            List(pokemonList) { pokemon in
                HStack {
                    Text(pokemon.name)
                    Text(pokemon.type).foregroundStyle(pokemon.color)
                }
            }.navigationBarTitle(Text("Pokémons"))
        }
    }

    func addPokemon() {
        if let randomPokemon = pokemonList.randomElement() {
            pokemonList.append(randomPokemon)
        }
    }
}
We are using the native .randomElement() function of an Array to get a random element. The returned element, however, is optional. That is because in the case of the Array being empty that function would return nil. That’s why we append the returned value only in the case .randomElement() doesn’t return nil.
Next let’s add a Button view to our Navigation and have addPokemon being executed once tapped!
struct ContentView: View {
    @State
    var pokemonList = [
        Pokemon(id: 0, name: "Charmander", type: "Fire", color: .red),
        Pokemon(id: 1, name: "Squirtle", type: "Water", color: .blue),
        Pokemon(id: 2, name: "Bulbasaur", type: "Grass", color: .green),
        Pokemon(id: 3, name: "Pikachu", type: "Electric", color: .yellow),
    ]

    var body: some View {
        NavigationStack {
            List(pokemonList) { pokemon in
                HStack {
                    Text(pokemon.name)
                    Text(pokemon.type).foregroundStyle(pokemon.color)
                }
            }
            .navigationBarTitle(Text("Pokémons"))
            .toolbar {
                ToolbarItem(placement: .topBarTrailing) {
                    Button(action: addPokemon, label: { Text("Add")})
                }
            }
        }
    }

    func addPokemon() {
        if let randomPokemon = pokemonList.randomElement() {
            pokemonList.append(randomPokemon)
        }
    }
}
We can use the .toolbar function to add ToolBarItem Views to our Navigation. Those views can be on the left side (leading) or on the right side (trailing). It’s up to you where you want them 😊!
Go run your app and add Pokemons 🥳!
I hope you found it useful! If you have any suggestions or feedback, let me know. I’d love to hear from you!